
Now that the rural house adventure is coming to an end, I have to move my workshop to another garage. After the proper cleaning, I gave a coat of white paint to the cement floor, followed by another coat with a bit of blue tint. I’m not sure if it’s the most suitable paint, so I might also apply some anti-slip paint or perhaps buy an anti-fatigue mat, we’ll see. For now, I had a job that needed to be done as soon as possible because one of the workshop walls lets in moisture from the other side, and it wouldn’t look very good in the videos if I left it as it was. Eliminating the moisture is not feasible, so I decided to cover the wall. Therefore, I am going to install tongue and groove paneling.
You can also see on this blog my jig to milling tongue and groove with the router.
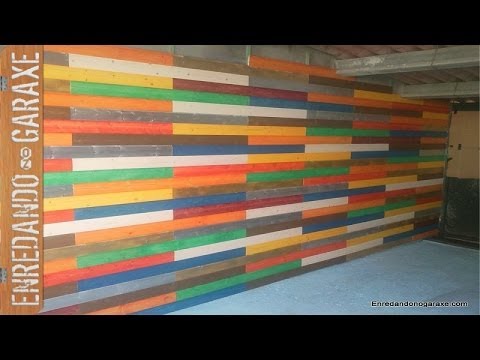
Some of you might think that leaving the wall with the natural wood color would be perfect for a woodworking channel, but I wanted to give it a touch of color, or rather colors. I hope I didn’t overdo it, and it doesn’t hurt your eyes to see so many colors (Those of you who follow my Spanish woodworking videos channel already know that I ended up painting the tongue and groove paneling white).
The moisture coming through the wall is not much, but enough that it’s not worth painting it, so I thought the best option would be to cover it with tongue and groove paneling. In the garage where I had the workshop that you have seen in my videos so far, there was also moisture in the wall (much more, sometimes even a small layer of water) and on that occasion I covered it with plastic and particleboard panels over treated wooden battens, and although the particleboard deformed due to changes in temperature and humidity (and I’m not referring to swelling from absorbing water), I think it held up quite well. Since the moisture is much less in this wall of this other garage, I am sure that covering it will be a good and cheap option.

The tongue and groove paneling I bought is the cheapest I found, with broken knots and some areas where resin oozes, although luckily it only oozes a bit of resin in a couple of places on the front side. I certainly wouldn’t use this paneling for the inside of the house.

To paint it, I rummaged through all the old paint cans I had, including those for painting metal, and found a pack of string I had bought some time ago. However, I had to buy a can of red paint and another of yellow (mixing them I also got orange). Making a ball of string, soaking it in paint, and rubbing it on the boards, I painted them little by little. This way, instead of having painted wood, we get a stained wood effect, with all the grain perfectly visible. Once I had them painted, I cut them all in half. And some of those halves I also cut in half.
After a while, I painted this wainscoting white. I also made a small wooden wall with battens and particleboard.
To install the wood wainscoting on the wall, I first need to install vertical battens. The ones I used are treated and were also the cheapest I found.
I drilled a hole in the middle and another about 15cm from each end, drove a steel nail into each hole, placed the batten in the desired position (in my case 60cm apart from each other) carefully keeping it level, and hammered the nails in about half a centimeter. I removed the nails and the batten and drilled 8mm diameter holes in the marks left by the nails, inserted nylon anchors, and screwed the batten to the wall. I repeated this process until all the battens were in place.
Although now I recommend using a wider batten than the one I used. Or else place two battens together. This way, it will be easier to ensure that the joint between two consecutive tongue and groove boards aligns well over the vertical battens, and we won’t have problems when nailing.

On top of the battens, I placed two layers of greenhouse plastic to protect the tongue and groove paneling from moisture. In the other workshop, I placed the plastic directly against the wall, but I think separating the plastic from the wall will help ventilate the moisture. Since the battens are in direct contact with the damp wall, they needed to be treated.
All that was left was to nail the tongue and groove boards to the battens using headless nails. The most complicated part is nailing the bottom row, but if we install it with the help of a level while placing the next row, as seen in the video, we will manage to keep it level. The rest of the rows are very easy to place, and I only had to be careful not to place two boards of the same color next to each other. From the second row onwards, I only use one nail in the middle of the top part of the boards.


There are systems to hide the nails and also clips for installing tongue and groove paneling that go hidden, but I didn’t need that much for the workshop. Normally I would countersink the nail heads in the wood with a punch, but I leave the nail heads slightly protruding because I want to be able to remove them if necessary in case the changes in humidity and temperature affect these boards too much.