


Let’s see how to use a doweling jig to make a bookshelf with a melamine board.
This curious accessory serves as a drilling guide to precisely drill all the necessary holes to join the different parts of the bookshelf with wooden dowels. And the best part is that it’s very easy to use thanks to its design that makes the holes we drill for the joints align perfectly.
2 step-by-step videos in this post where we see many tricks to use the drilling guide, from making regular joints to more complex ones.
Let’s go step by step. Making this melamine board bookshelf was easy thanks to the guide, but I want to show all the steps. So there will be quite a few images to detail the step by step. And of course, I’ll also include the videos where you can see how I made this piece of furniture.
Join the sides and shelves of the bookshelf with wooden dowels
We start from the previous post where I show the plans, the cutting list, and how I marked where to drill the holes for the wooden dowels. And from there, we see how I make the holes.
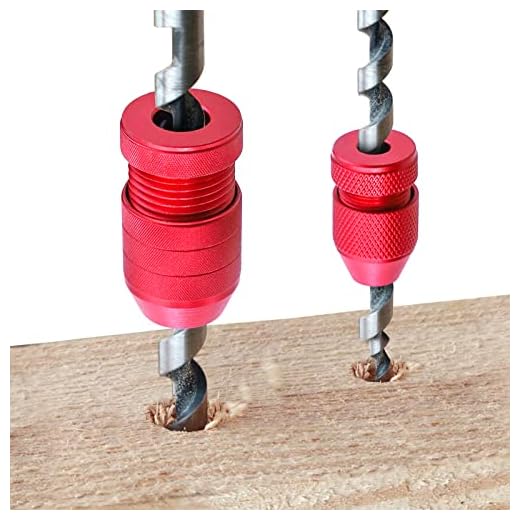
To make the joints of all the pieces of the bookshelf, I will use an 8mm helical drill bit for wood and 8mm wooden dowels. And the Wolfcraft doweling jig.


In this article, there are two videos. In the first, we see how to use the drilling guide to make the main piece joints of the bookshelf. And in the second video, we will see how to make the joints for the reinforcement and the kickplate, for which some tricks are necessary when using the dowel jig.
In this first video, we see how to use the drilling jig to make joints of the shelves.

First, I adjust the drilling depth on the board faces. A washer and a drill stop help ensure that the hole stays a few millimeters from the other side. Note that I removed the lower stop from the Wolfcraft doweling jig. To adjust the depth at which I need to drill the holes for the dowel joints, the base of the doweling jig should be flat against the board.

In case there’s any doubt, I use one of the pieces I will use to make the bookshelf. I put a thick washer, let the tip of the wood drill bit rest right on top, and adjust a drill stop clamp.
With that adjustment, I drill a hole in a scrap piece and insert a dowel.


A random piece of board will do, as long as the drill bit doesn’t go through to the other side.
And I make a new adjustment. Ideally, I would have two drill bits and two depth stops, but if not, I’ll use the same ones. Although later, I will have to go back to the previous adjustment.

I place a 3 or 4-millimeter sheet over the dowel and put the dowel guide on top. I slide the drill bit until the tip rests on the board and adjust the depth stop. How easy it was!
Now I can drill the holes in the edges of the shelves using the wooden dowel guide. However, before starting to build the bookshelf, it is recommended to make some test joints to ensure everything goes smoothly.

This doweling jig fits on the edge and rotates until it stops, so the hole corresponding to the drill bit diameter is centered on the shelf edge. Thus, I drill a hole at each of the three marks, rotate the shelf, and drill the three holes on the other edge.
I do this with all four shelves. And you can see in the image that to drill more comfortably, I clamp the shelves and keep them inclined with a piece of wood strip.
Once all the holes are drilled on the edges of the boards, I apply glue inside and insert a wooden dowel.


There are three reasons for inserting the dowels into the edges first: the first is that the protruding part of the dowel helps to align the guide to drill the corresponding aligned hole in the side panels of the bookshelf; the second is that if I glued the dowels into the side panels first, I would still have to insert them into the edges of the shelves without glue to adjust the drilling jig, then remove and glue them into the side panels; and the third is that with just a bit of the dowels left to insert, they won’t apply as much pressure when entering the holes on the side panels. Otherwise, I would have three long dowels to insert simultaneously, which would mean a lot of pressure.
Now I re-adjust the drill stop to drill the faces of the boards (the adjustment I made when I inserted the dowel into the scrap piece, the white board piece I used to adjust the stop the first time).
Let’s see how we use the guide to drill the sides of the bookshelf.


This is when the numbering I had written on the masking tape in the previous post comes into play. I match the marks by placing the corresponding edge with dowels of the shelf next to the pen line with the same number. The edge with the edging should be on the same side as the edging of the bookshelf side. And both pieces should be perfectly flush.


- Fit the corresponding notch on the front of the doweling jig, on the corresponding dowel protruding from the edge of the shelf.
- Align the doweling jig alignment marks with the pen line.
- Drill the hole in the side of the bookshelf.


I drill the three corresponding holes for that side of the bookshelf, drill the holes for all the shelves on that side panel, and then drill the corresponding holes to make the joints on the other side panel of the bookshelf.
There’s just a small change for the top shelf, the one that aligns with the top of the bookshelf sides.


I put the lower stop back on the dowel jig. I fit the corresponding hole of the guide onto one of the dowels protruding from the edge of one of the shelves. I push the lower stop against the board until it is flat against it and lock it by tightening the knob on the top.
And now what changes is that instead of adjusting the doweling jig over the pen mark, which in this case isn’t there, I push the doweling jig until it stops against the board. The rest is the same: with the shelf always flush with the sides of the bookshelf side panels, and the edges with edging on the same side, I fit the front of the doweling jig onto the corresponding dowel protruding from the shelf edge and drill the hole, repeating the process to make all the holes for both sides of the bookshelf (three on one side panel and three on the other).
How to place the bookshelf reinforcement and kickplate
It’s time to place the kickplate and the reinforcement. And for this, I will need some extra tricks when using the dowel jig.
In this second video, we’ll see how to make the joints for the reinforcement and the kickplate, for which some tricks are needed when using the doweling jig to drill the holes.

We will also keep in mind that these two pieces will not be flush with the front nor with the back of the bookshelf, but will be recessed about 8mm inward.
Where to place the kickplate and the reinforcement
As I mentioned, these two pieces of the bookshelf are a bit harder to place. And the first thing is to be clear about where and how we are going to place them.
The reinforcement goes at the back of the bookshelf just below the third shelf from the bottom. Meanwhile, the kickplate goes at the front under the bottom shelf.


The function of the reinforcement is to prevent the bookshelf from moving sideways, while the kickplate gives the bookshelf a finished look. Without that small detail at the base, there would be a gap under the first shelf, giving the impression that something is missing. And yes, the kickplate also helps a bit to prevent lateral movement, but I think the reinforcement is still necessary.

Also, to make it look better, I will recess the kickplate about 8 millimeters inward. It would be easier to leave it flush with the front of the bottom shelf, but that small detail will make it look much better. And since I’m at it, I’ll do the same with the reinforcement, although it will barely be noticeable in this case.
So, I need to mark the position where to drill the holes for the dowels to place both pieces.


In the images, we can see where I drew the reference lines for the dowel guide. Those lines were drawn 16mm from the board edge. The 8mm that I recess the pieces inward plus 8mm corresponding to the board’s midpoint. In the video, I think I mention that the board is 17mm thick. Well, half a millimeter or a millimeter more or less doesn’t matter as long as I make all the lines the same distance.
We’ll see below that, due to how I will adjust the guide, one line would suffice. But it’s always good to have the lines drawn to ensure we are drilling where we should and not making mistakes on the board’s side.
Drilling holes in the edges of the kickplate and reinforcement
To start, I drill the holes in the top edge of the kickplate and of the reinforcement. Two in each piece. Nothing complicated since the guide centers the holes by itself.


Here, the drill bit has the stop adjusted as we saw for drilling the shelf edges, of course.
I place the pieces in a position that is comfortable for working and drill the holes.
And now it’s time for the two short sides of both pieces.


For the reinforcement, there’s no problem as I can work as I did with the shelves. But the sides of the kickplate are very short, and the drilling jig has nowhere to rest when rotating to center it.
The trick to drilling narrow pieces with this type of wooden dowel guide is as simple as clamping a couple of slightly wider pieces in front and behind. Both pieces should be of the same thickness so that when rotating the guide until it stops against those pieces, we drill the hole perfectly centered.
Now we can drill the holes in the faces of the bookshelf sides to make the joints.

I attach the lower stop to the dowel joint guide and lock it in the position shown in the image. Note that first, I align the side alignment marks of the guide with the pen mark. In that position, I push the stop against the edge of the board and lock it. The reason for this is that now I can forget about the pen marks since I know I will always drill the holes at the same distance from the board edges.


To drill the holes under the shelves, I align the kickplate and the reinforcement with the corresponding shelves, fit the front of the drilling guide with the corresponding dowel, push the doweling jig until it stops against the shelf edge, and drill the hole. And so I make the two holes under each shelf to make the joints with the wooden dowels.
Notice that on the reinforcement and the kickplate, I have a piece of masking tape that tells me which is the front. Because of their position, at the back of the bookshelf in one case and at the front in the other, in one case the tape is facing down when drilling under the shelf, and in the other case, the masking tape is facing up.
To drill the holes to insert the dowels into the bookshelf sides, I need another trick.


I fit the shelf’s corresponding dowels into their position and hold it vertically with that simple homemade support we see in the images. I place the reinforcement against the bottom of the shelf with the sticker indicating the front facing down, and drill the holes. Note that I put the sticker facing down when drilling the holes to make the joints on both sides.
But when preparing the holes for the kickplate, there are a couple of changes. First, because the sticker will face up, and second, because there is no space to place the doweling jig in the necessary position, as it hits the shelf.


But well, I place the kickplate against the bottom of the shelf, clamp it with a couple of carpenter clamps, remove the shelf, and I have space to use the guide and drill the necessary hole.


I still have to glue and join all the pieces of the bookshelf, but we can see in the images how nice the reinforcement and the kickplate look.
Gluing and assembling the bookshelf
With all the holes drilled, I can now glue the dowels and assemble the bookshelf. We already saw that I first need to have the dowels glued in all the holes I made in the edges of the pieces.
And a small recommendation: for gluing a project like this, it’s better to use regular carpenter’s white glue. If we use quick-drying glue, we might find it starts to dry sooner than expected, making it difficult or even impossible to insert the dowels into some holes.

First of all, I will clean the holes with the help of the workshop vacuum. I should also do it with the holes I made in the board edges. If any large chips remain inside and a dowel doesn’t fit well, I’ll have a problem when assembling the bookshelf.


First I join the reinforcement under the corresponding shelf. I apply glue into the shelf holes and make the 90-degree joint of the reinforcement with the shelf. Then I apply glue to the bookshelf side panel, fit the dowels into the side holes, and tap them gently. Without forgetting to use a scrap piece to distribute the pressure of the taps and not damage the boards.


The same with the kickplate and bottom shelf. And I continue with the two remaining shelves.


I glue the second shelf and glue the top shelf.
I apply glue in the holes of the other side panel of the bookshelf, place the already assembled parts on top, and carefully fit the dowels into the holes.


A few gentle taps with the help of the scrap piece, and I have all the dowel joints of the bookshelf, which weren’t few, done.


I check that the board joints are at 90 degrees, tighten the joints with straps and carpenter clamps, and ensure everything is still at 90 degrees. And I let the glue dry. I also check the joints in case I applied too much glue, and now it oozes out, needing to be cleaned before it dries.

And finally, we have the finished bookshelf. It may seem like a bit of a complicated job, but thanks to this dowel joint guide, if we understand how it works and where each piece goes, this small piece of furniture is easy to make.

Now we just need to see how to install the doors with cup hinges.
