


Placing concealed cup hinges seems like a task reserved for expert carpenters, but let’s see how to do it easily and quickly using a jig for concealed hinges.
Two step-by-step videos are included in this post (but second vídeo is in Spanish), where I use two different models of jigs for concealed cup hinges.
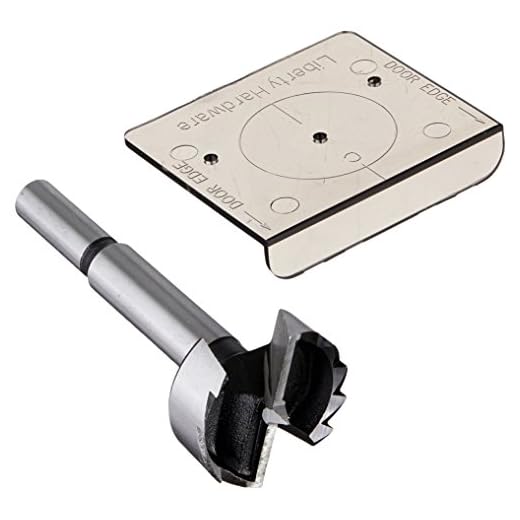
The jig I’m going to use works for installing 35mm or 26mm concealed hinges. Depending on the size of the cup hinge, we will use the jig on one side or the other. Stop wondering how to install concealed hinges, here we will see it in detail with a jig that avoids the hassle of measuring.


Here are some images and explanations on how to install concealed hinges, but I think the video shows much better how to install concealed hinges using the jig.

We can also use a hinge jig kit that includes almost everything we need for this job.

To work more comfortably, I placed the bookshelf we saw how to make in previous posts on its side on my workbench. You might be installing this type of hinge on a kitchen cabinet that you can’t move, but the procedure is the same. However, it is recommended to have someone hold the door when marking where to drill the holes for the cups and when screwing the hinges to the doors.

Don’t miss the article where we see how to make the melamine board bookshelf to which I am attaching the doors.
We see in the images that I attach a piece of wood with a clamp as a stop to ensure that I always work with the door in the position I want to install it.


I measure the distance to place the concealed hinges from the top and bottom and position the jig, with the spacer against the edge of the panel, to mark where the holes for the mounting plate go. The mounting plate is the part of the concealed hinge that is screwed into the inside of the cabinet.
Now I can drill those two holes with a wood drill bit.


I use a drill bit with the exact diameter for the plastic pins of the jig. I will only drill to the depth needed to fit those plastic pins. This way, I can fit the jig into the holes.


I place the door in its position as it would be open, and fit the jig into the holes I already drilled. The jig’s spacer should be “pressed” between the edge of the bookshelf body and the edge of the door. I try to keep the spacing the same along the entire door, for which it would be ideal to have two jigs. And I mark where to drill the hole for the cup.


Now I can drill the holes for the cup hinges. If you’ve never done this job and wonder how to make cup holes for hinges, it is recommended to use a Forstner bit and a drilling guide. Additionally, a drill stop will prevent you from drilling through to the other side of the panel.
It is important to adjust the stop to ensure we do not drill through to the other side of the panel. In the video, you can see how I adjusted it with the help of a washer.
Installing cabinet hinges with the help of this jig is simple, and the biggest problem I encountered was finding suitable screws to screw the mounting plate.


These special screws for concealed hinges have the right length to not go through the panel, and their thread’s edge has the proper geometry to grip well in particleboard. In the video, I show the ones I had to use since I couldn’t find the right ones. In any case, I recommend doing tests on a panel to ensure it will be properly installed.
If we use the correct screws for the concealed hinge plate, we may need to drill the holes a bit deeper than those I made to fit the jig pins. Always use a drill stop to avoid drilling through to the other side of the panel. Don’t forget that wood drill bits have a point that could go through to the other side.


Once I have the first door installed, I turn the bookshelf and install the other door. And I have this small piece of furniture complete, which I was able to make thanks to some guides and jigs that made the job much easier.