
Hello everyone! Today I am going to show you how I made this copper and wood ring with my lathe. As a general rule, the materials I use in my projects are quite affordable and easy to find: wood shavings, copper pipe and copper wire from any electrical cable.
Well, as you may have guessed from the video, this is a project by Lluis, from the YouTube channel Woodworking Barcelona.

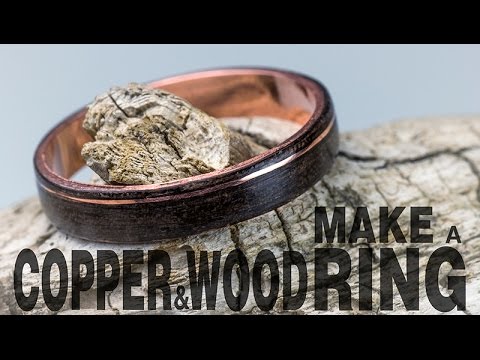
This time I am going to use a rather exotic wood: Caesalpinia granadillo (aka Ebony Brown or Guayacan), which is one of the hardwoods we can find on Earth, between 20-25% harder than ebony. There is no doubt that it is a very suitable wood for jewelry. Until now, I have been using the Dremel tool to make my rings, and now that I have the lathe I can make a faster and more precise work.

Let’s see how I made it: First, we need the finger measurement of the person who is going to wear it. Once we have it, we mark it on the stainless steel mandrel.

Now we cut what will be the base of the ring from a piece of copper pipe. I prefer to use my scroll saw for this job.

Next, we need to accommodate the inner diameter of the copper ring to our desired size. To make the process easier I recommend to heat the copper until it becomes red hot. For this job I used a propane torch. Tip: remember to distribute the heat evenly throughout the piece to avoid structural damage.

Next, it’s time to shape the ring on our steel mandrel. To avoid leaving marks on the copper ring I recommend using a rubber mallet. You have to be patient in this step, and you may need to reheat the copper ring several times as it hardens during hammering. You can reheat it as many times as you need.

Then, I put the ring on a wooden mandrel that I have made for turning wood rings on the lathe. It has a conical shape to accommodate different ring sizes. I recommend doing it with a hard or semi-hard wood. Once assembled, I started cleaning the rust and preparing the surface to add the wood.

We can polish the inside face of the ring now or at the end of the whole process, the choice is yours. To polish the inside I used my dremel tool with a wool attachment and some metal polishing paste.

Now we can continue with the ring shaping. To do this I use a cheap chisel and so I cut it to the desired thickness and width. You may need to securely fasten the ring on the mandrel. You can do it with masking tape or a drop of cyanoacrylate glue. Once this is done, I focus on the wood.

I chose Granadillo because of the beauty of its color, its narrow grain, as well as its high density. I have to say it was hard work to get the shavings, even using my newly sharpened planer. Then, we apply more cyanoacrylate to the copper ring and start gluing the Granadillo shaving until we reach the desired thickness. Remember to sand the ends of the shaving to avoid irregularities in the thickness of the ring.

Now, we even the wood surface of the ring with a precision metal file,

followed by light sanding with 500 grit sandpaper, 000 grit steel wool and nail polish. Then we make a small recess with a chisel to embed the copper wire, also gluing it with cyanoacrylate glue. After that, a little polishing plus sanding and our DIY ring is already made.
I hope you enjoyed this DIY project. If you want, take a look at the video on how to make this copper and wood ring, and subscribe to my channel if you are interested in my projects. Greetings!